Using the Emergency IP to access the Admin Tool on a Windows PC
Overview: Access Emergency IP: Assign a Static IP/Subnet Windows PC
Assigning a static (manual) IP address to a Windows PC ensures the device always uses the same IP on the network. This is sometimes required when connecting devices to a CHEKT system, ensuring consistent communication between network devices, or in this instance connecting to the CHeKT VCP's Emergency IP for network troubleshooting via the Admin Tool if the device is offline.
This guide will walk you through:
- Using CMD prompt: ipconfig to find your current network settings
- Locking in your current IP address as a static IP
- Adding the CHEKT Emergency IP as a secondary IP address on a separate subnet
Step 1 — Find Your Current Network Settings
- Press Windows Key + R, type cmd, and press Enter to open Command Prompt.
- Type the following command and press Enter: ipconfig
- Locate your active network adapter (either Ethernet or Wi-Fi) in the results.
- Write down the following values before continuing:
Note: The exact values you will enter in the following steps to lock in your current IP as a static address will be provided via CMD: ipconfig. These are just examples.

Step 2 — Open Network Adapter Settings
- Press Windows Key + R to open the Run dialog.
- Type the following and press Enter: ncpa.cpl
- The Network Connections window will open directly, showing all available network adapters.
- Identify the adapter you want to configure:
- Ethernet— if the PC is connected via a network cable
- Wi-Fi— if the PC is connected wirelessly
Tip: Using ncpa.cpl skips directly to the Network Connections window, bypassing the need to navigate through Windows Settings.
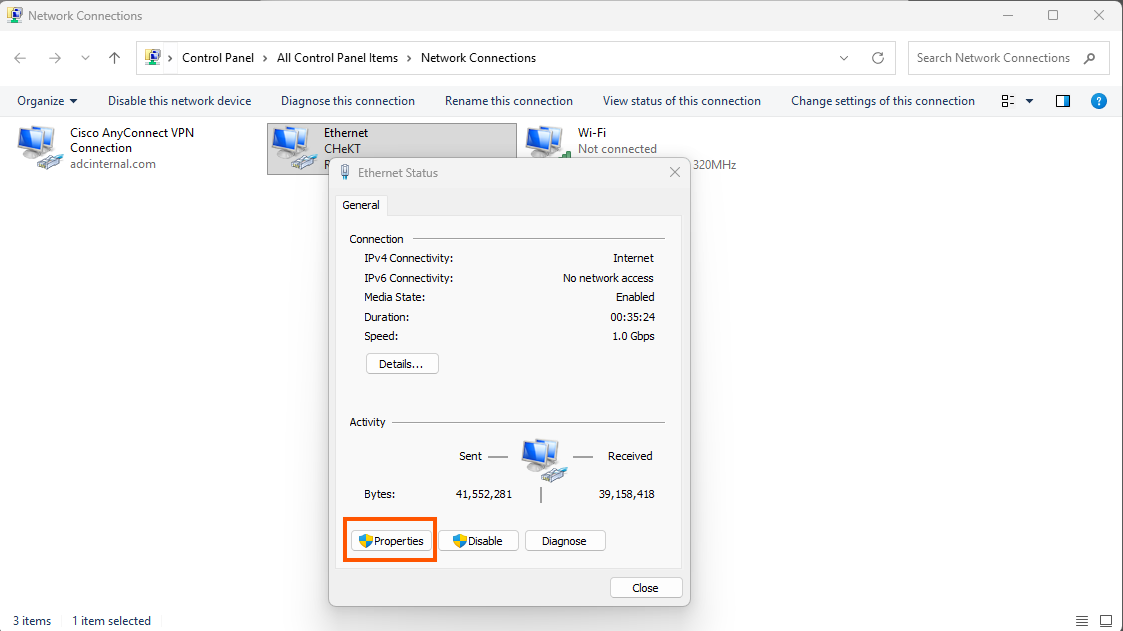
Step 3 — Open Adapter Properties
- Right-click on the correct network adapter.
- Select Properties from the context menu.
- The adapter's Properties window will open.
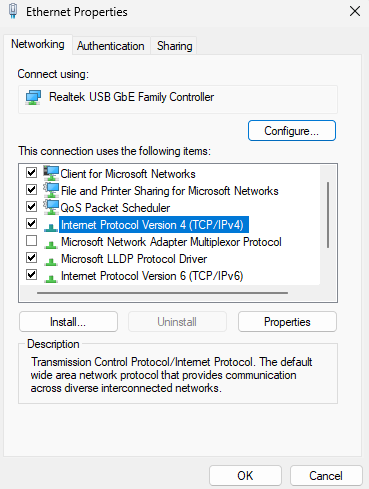
Step 4 — Open IPv4 Settings
- In the Properties window, locate Internet Protocol Version 4 (TCP/IPv4).
- Double-click it, or select it and click the Properties button.
- The Internet Protocol Version 4 (TCP/IPv4) Properties window will open.
Step 5 — Enter Your Current IP as a Static IP
- Select the radio button for Use the following IP address.
- Enter the exact values you retrieved from ipconfig:
- IP address:(e.g., 172.16.9.236— your current IP)
- Subnet mask:(e.g., 255.255.255.0)
- Default gateway:(e.g., 172.16.9.3)
- Select the radio button for Use the following DNS server addresses.
- Enter your DNS details:
- Preferred DNS server:8.8.8.8
- Alternate DNS server:8.8.4.4
Important: Use the exact IP address currently assigned to your PC from Step 1. This locks it in so the router can no longer reassign it until disabled.

Step 6 — Add the CHEKT Emergency IP via Advanced Settings
- Without closing the IPv4 Properties window, click the Advanced... button at the bottom.
- The Advanced TCP/IP Settings window will open — ensure you are on the IP Settings tab.
- In the IP addresses section, click the Add... button.
- A TCP/IP Address dialog box will appear. Enter the CHEKT Emergency IP details:
- IP address: 192.168.250.99
- Subnet mask: 255.255.0.0(Enter the matching subnet also provided via CHeKT Emergency IP)
- Click Add to confirm.
Tip: Contact CHEKT support or refer to your CHEKT device documentation for the correct Emergency IP address and subnet mask to use. It will be on a physical SN sticker on the bottom of the unit, or via Site Details > Devices > VCP Settings > Network tab > Emergency IP.
Note: The CHEKT Emergency IP is on a different subnet than your primary IP, allowing your PC to communicate on both networks simultaneously without any conflict.
Step 7 — Save and Apply All Settings
- Click OK to close the Advanced TCP/IP Settings window.
- Click OK to close the IPv4 Properties window.
- Click OK (or Close) to close the Adapter Properties window.
- Windows will apply all changes immediately — no restart is required.
Step 8 — Verify Both IP Addresses
- Press Windows Key + R, type cmd, and press Enter.
- Type the following and press Enter: ipconfig
- Locate your network adapter and confirm:
- ✅ Your primary static IP matches the IP from Step 1
- ✅ The CHEKT Emergency IP appears as a second IPv4 address on the same adapter
If both IP addresses are listed, your PC is fully configured and ready to communicate on both subnets simultaneously. At this point you can type the Emergency IP in your preferred browser to access the Admin Tool directly.

Troubleshooting
For additional assistance, contact your system administrator or CHEKT support.