CHeKT Video Control Panel Zone Types & Setup Guide
The CHeKT Video Control Panel Supports Nine Zone Types

These zone types operate similarly to zone types found on standard alarm panels.
Entry/Exit Zone (Alarm Code: E134 | Restore Code: R134)
This zone applies an Entry/Exit delay to triggers.
Exiting: After arming the panel, the Bridge will ignore any triggers on this zone for the duration of the Exit Timer setting.
Entering: After the first trigger, the Bridge will ignore any additional triggers on this zone for the duration of the Entry Timer setting. If the VCP is not disarmed within 60 seconds (default), the first event video will be uploaded to the Monitoring Portal as an alarm.

Default Entry/Exit timer settings can be adjusted in the VCP Settings Menu.
Follower Zone (Alarm Code: E132 | Restore Code: R132)
A Follower zone behaves like an Entry/Exit zone if an Entry/Exit zone has already been triggered. If no Entry/Exit zone has been triggered first, this zone will behave as an Instant zone.
Instant Zone (Alarm Code: E130 | Restore Code: R130)
When the VCP is armed, all alarm triggers on this zone will be immediately uploaded as events to the Monitoring Portal.
24-Hour Zone (Alarm Code: E133 | Restore Code: R133)
This zone uploads events to the Monitoring Portal regardless of whether the VCP is armed or disarmed.

Important: If video verification is required on any 24-hour zone, this zone type must be used.
Exterior Zone (Instant) (Alarm Code: E136 | Restore Code: R136)
Behaves the same as the Instant Zone described above, but uses the independent alarm code (E136) to allow custom automation responses for outdoor detectors.
Exterior Zone (Entry/Exit) (Alarm Code: E134 | Restore Code: R134)
Behaves the same as the Entry/Exit Zone described above, and uses the same alarm code (E134).
Intercom Armed Zone (Alarm Code: E420 | Restore Code: R420)
When selected, any events from this zone will send a remote intercom notification to the customer End-User App and, if enabled, a signal to the monitoring station. As an Armed Zone, events are only sent when the system is armed. If the central station signal is enabled, it is sent concurrently with the customer End-User App notification.
Intercom 24-Hour Zone (Alarm Code: E420 | Restore Code: R420)
When selected, any events from this zone will send a remote intercom notification to the customer End-User App and, if enabled, a signal to the monitoring station. As a 24-Hour Zone, events are sent when the system is armed and disarmed. If the central station signal is enabled, it is sent concurrently with the customer End-User App notification.
Live Video Only Zone (No Alarm Code)
This zone type is intended for cameras that should not generate any events. When selected, all alarm triggers from sensors, analytics, and API alarms will be ignored.
Important: Use this zone type only for cameras where event recording and monitoring station notifications are not required.
Setup Guide
Follow these steps to update the zone type for a specific channel:
1. Navigate to the channel you want to update and click the Settings gear icon
.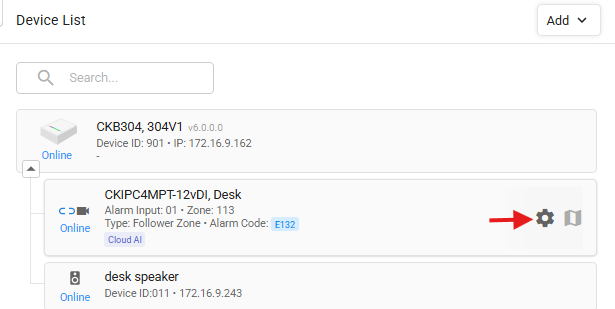
.
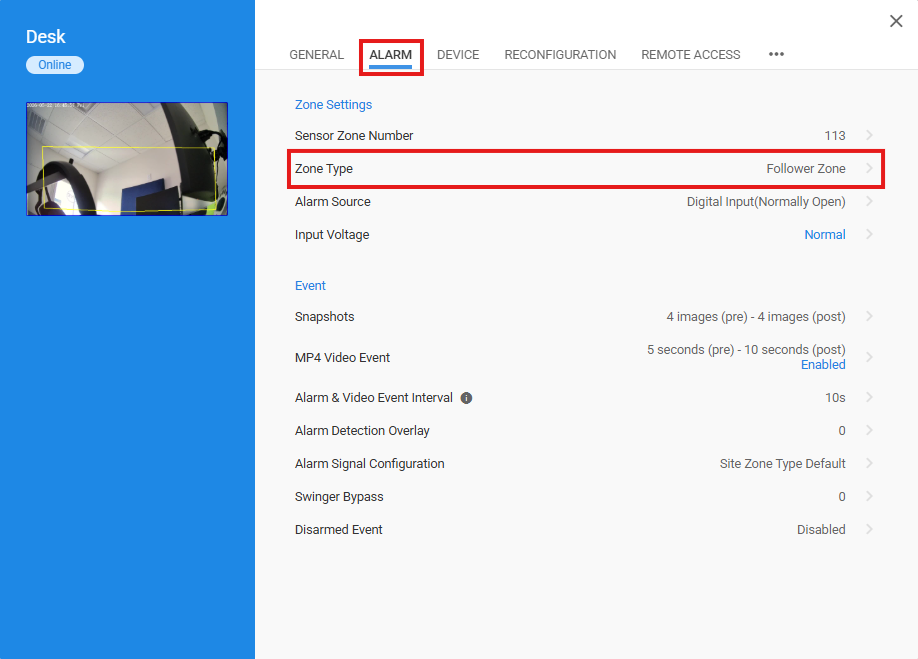
2. Select the Alarm Menu tab, then click the Zone Type.
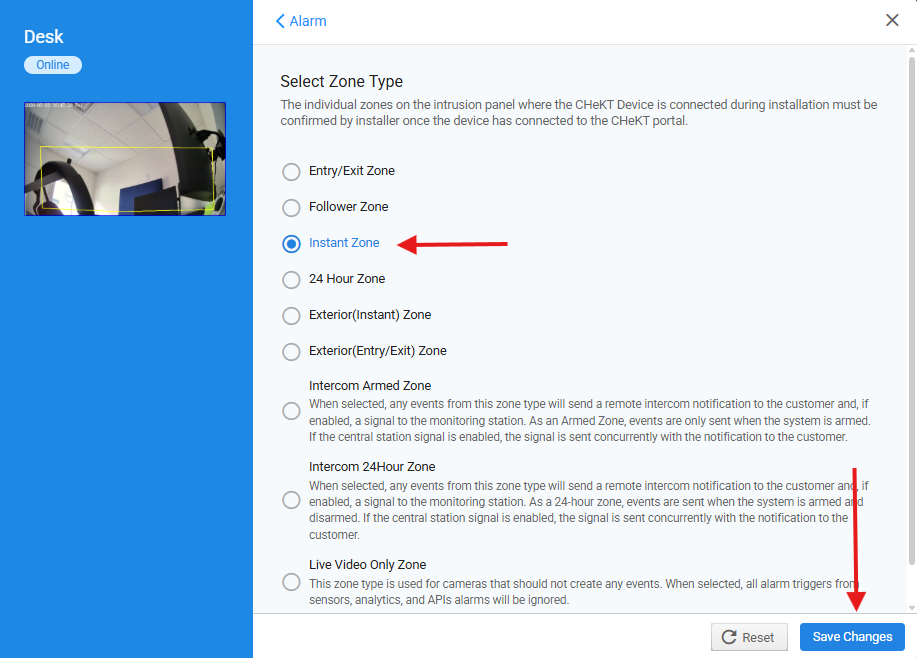
3. Select your desired zone type from the available options and click Save Changes to apply the update.
Related Articles
Configuring the Entry\Exit Delay Timers on the CHeKT VCP
The CHeKT Video Control Panel (VCP) supports nine zone types. These zone types operate like zones on standard alarm panels. Learn about zone types in our CHeKT Video Control Panel Zone Types & Setup Guide article. Configuring VCP Entry & Exit Delays ...Adding Cameras to a CHeKT Bridge
Links to Additional Steps Creating A Site: Creating a New Customer Site Site Arming Method: Setting Site Arming Source Registering a Bridge: Registering a CHeKT Bridge Alarm Panel Wiring: Alarm Panel Pairing: Programming an Alarm Panel with The ...CHeKT AI Cameras Analytics Manual
The latest licenced plug-in is a set of analytical tools loaded on our cameras that provides the means to perform advanced analytics, reduce false alerts and customize when events occur. This article will describe how to enable and configure the ...VMS Video Vault – Site-Based Cloud Video Recording & Storage Services
Overview CHEKT's VMS Video Vault is a site-based cloud video recording and storage solution. Each site can be individually assigned a Video Vault plan, ensuring flexible and scalable storage options tailored to its unique security needs. Video Vault ...Cawamo-CHeKT Integration Guide
The Cawamo AI Server integrated with the CHeKT platform creates video AI event notifcaitons for alarm monitoring centers and customers using the CHeKT Mobile app. This integation allows sites to leverage Cawamo's advances AI as detection zones for ...