Integrating Cawamo with CHeKT

The Cawamo AI Server integrated with the CHeKT platform creates video AI event notifcaitons for alarm monitoring centers and customers using the CHeKT Mobile app. This integation allows sites to leverage Cawamo's advances AI as detection zones for alarm communication.

Before proceeding, you will want to have a CHeKT Bridge online (Firmware Version 3.5.0 or higher required) in your dealer portal with at least one camera connected, and that same camera is connected in your Cawamo Edge Unit.
1. Connecting your Cawamo Edge Unit
1) Please power up and connect the edge unit to the same network the video cameras and/or DVR/NVR are connected to. You will need a standard Ethernet cable to make this connection. (RJ-45).
2) If cameras are connected to a different subnet on the same network, we will need the IP address of that subnet (we will add an additional IP on that subnet to the Edge unit).
3) If you also received a Relay unit, please connect it to the same network that the edge and the cameras are connected to.
4) In case there is a firewall on this network, we will need the following ports to be open for the duration of the installation –This is a standard procedure with no security implications: • Port 8302 TCP/UDP • Port 8089 TCP • Port 7000 • Port 22 Connection SSH (for remote connection to the unit) • Ports 10000-12000 TCP, UDP • Port RTSP 554

If a static IP is configured on the unit and you see the edge live on your local network but not on the Cawamo portal, check DNS settings on the router or network firewall.
2. Accessing your Cawamo Reseller Dashboard
Please look for an activation email sent to you from donotreply@cawamo.com. The activation will take you to a login screen where you create a new password (your username is the email) and then to the relevant dashboard. The Cawamo platform also includes online support that will guide you through every vital installation step. To open the reseller dashboard click on the menu on the top left and select reseller dashboard. This page is where you will configure everything: clients, sites, edges, cameras, and services.

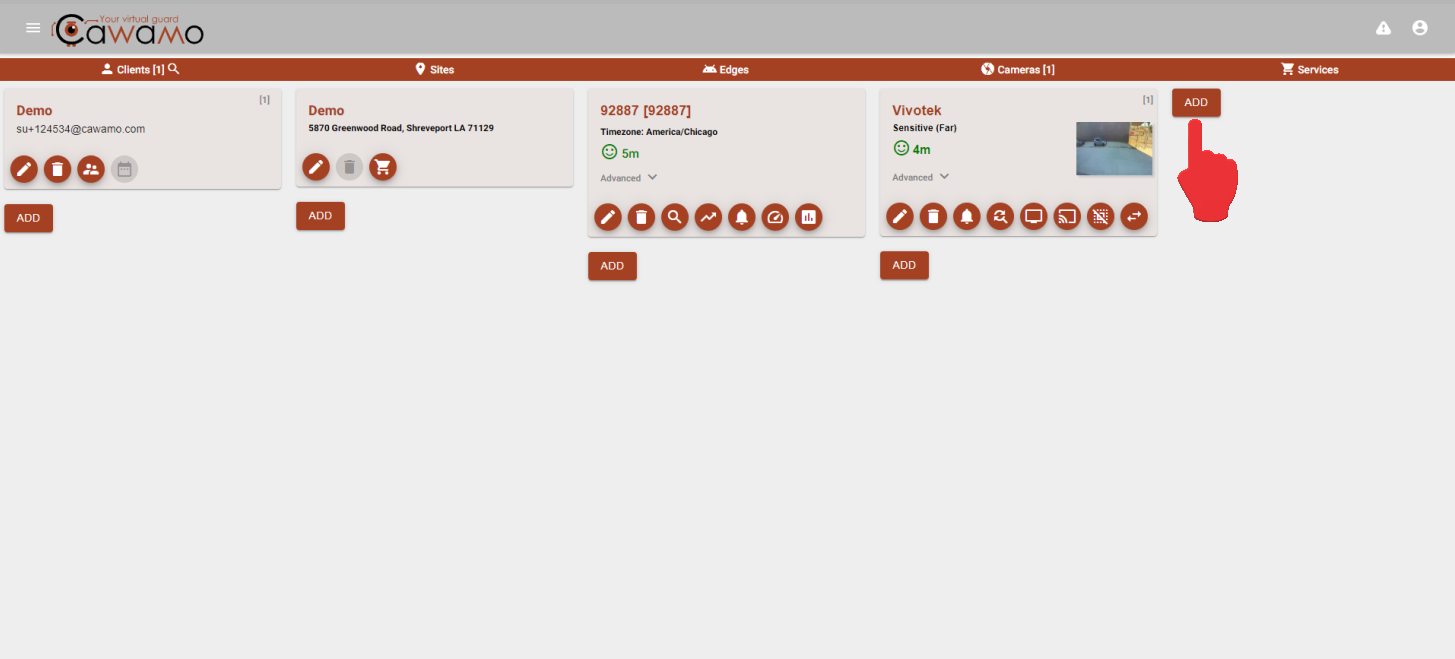
The Cawamo reseller dashboard is structured from left to right, general to specific. When you click on a client, all the sites under it will show, and so on. Please begin by adding a new client, site, and edge. When adding a client, if you do not want to set up a user immediately, you can enter "su+<a-number>@cawamo.com" and select "don't create client admin user" you can always add users later.

If you require assistance in creating a Client, Site, or adding the Edge Unit to your Cawamo Reseller Dashboard, please contact Cawamo tech support at (678) 399 2021 #2 or by emailing them at Support@cawamo.com.
3. Mounting Cameras to the Edge Unit
For ONVIF-compatible devices select auto(ONVIF), it will scan the subnet for devices. Otherwise, you can add via the NVR/Camera option or manually insert the RTSP stream. The usernames and passwords are the cameras or DVR/NVR credentials.

For best performance, please change the encoder to H264.
In the next window, name and ID your targeted camera as you have it on your CHeKT Dealer Portal, then click Next. In Cawamo, 3rd Party Camera ID will be the zone you listed for your camera in CHeKT.
Example:
In the next window, select method of mounting, in this example we will be choosing the Auto ONVIF Option:
Then select the IP address of targeted camera:
Once selected, type in the credentials of your targated camera on the next window and click next.
Once mounted, make sure all the devices are pinging with a green smiley face before proceeding, this make take a few moments.
4. Adding Service/Analytic Rule Configuration
To add a service/analytic rule, click on the recently added camera and click on the add button that appears next to it, under the services section.

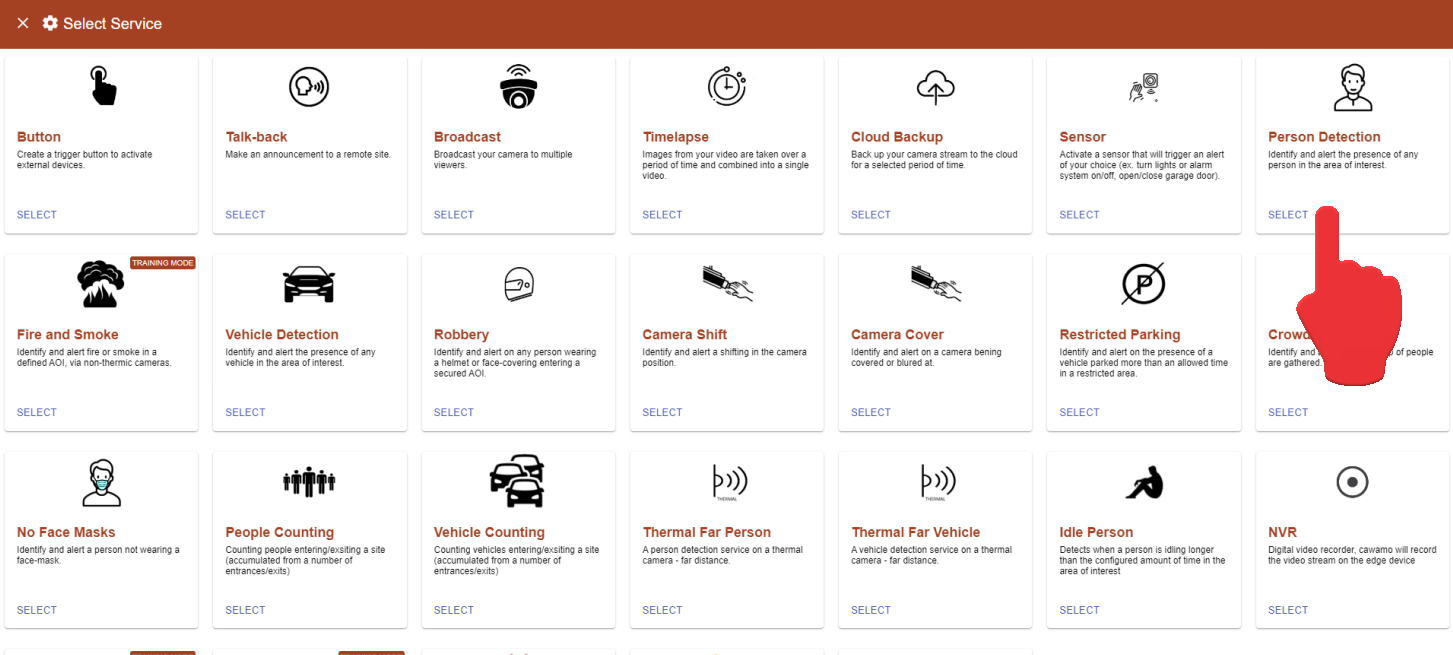
Select the desired service (i.e. person detection)

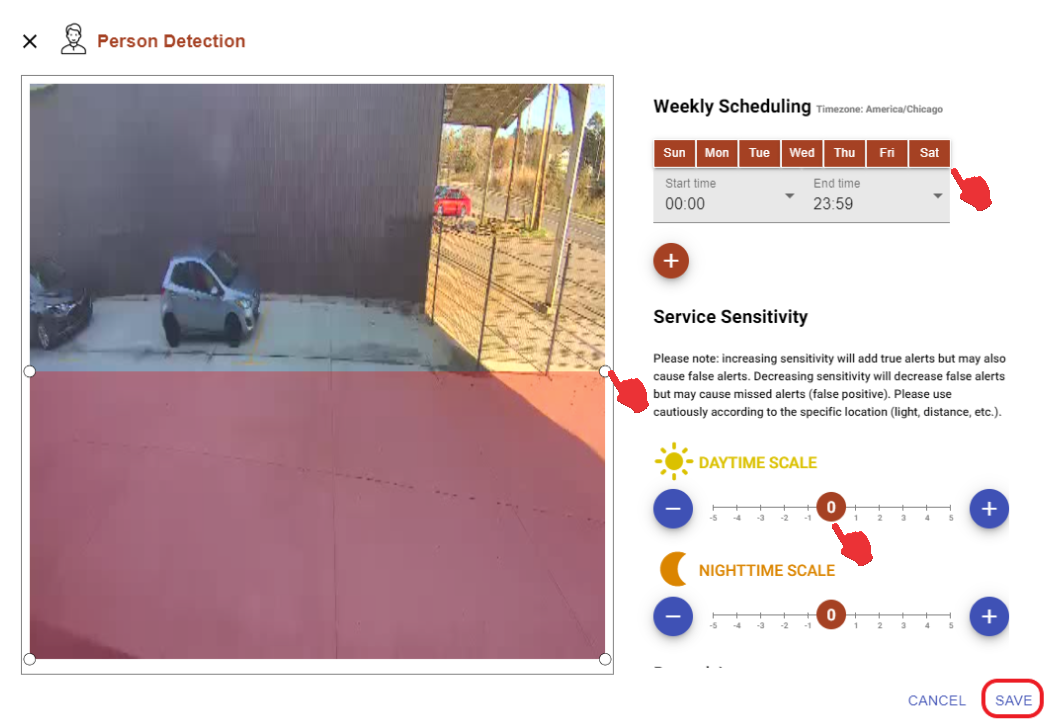
In the next window, draw region of interest (zone), set arming schedule, leave default day and night sensitivity as 0 if no outlying factors such as far distances, etc. Select static object if a permanent vehicle/human like object will remain on the scene, and click Save.

5. Enabling the API service in the CHeKT Portal
In your CHeKT Dealer Portal, access your Site Account and the configuration menu of the CHeKT Bridge thats hosting the same targeted camera by clicking the gear:
In the settings menu, click over to the Network tab and click on the Local API Service option

Take note of the Main IP on this window as it will be needed later in the process.
In the next section Enable the Local API Service using the slider:
In the same section, scroll down to view the API Keys and Port Info and click to generate an API Key.

Take note of the Username and Port, and copy the new generated key for the next process.
6. Linking to Cawamo
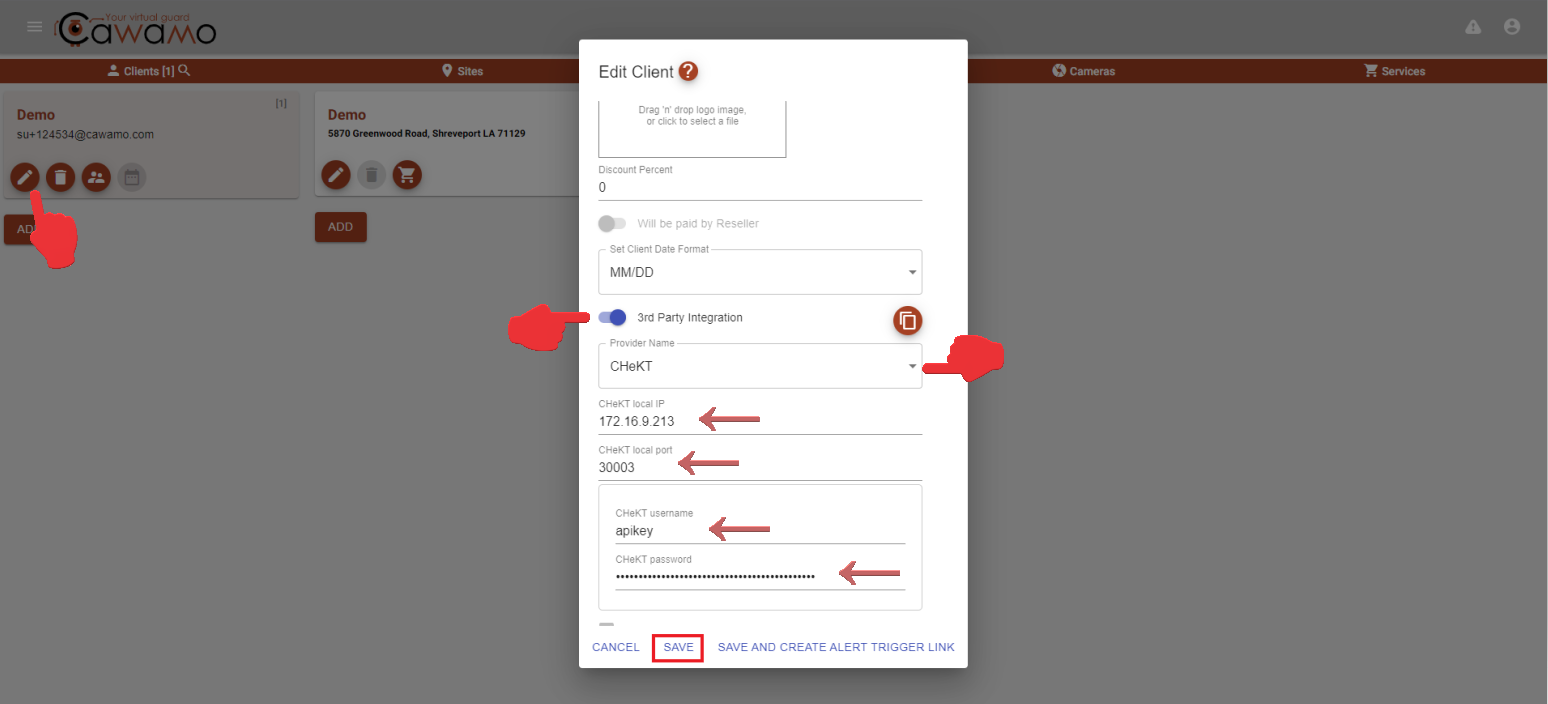
Return to your Cawamo Reseller Dashboard and click on the edit pen icon of your Client section. In the pop up Edit Client window, enable the 3rd Party Integration, click to select CHeKT in the Provider Name drop down menu, then with the information retained in the previous steps, fill out the CHeKT Local IP, CHeKT Local Port, CHeKT Username (apikey), and CHeKT Password (generated api key). Click Save to close and continue to the final step, testing connection.

7. Testing Connection
Arm your Bridge and open the CHeKT Monitoring Portal and proceed to trigger the previously added Cawamo Service (Person Detection). You may trigger by walking through the point of view of the targeted Camera or manually by clicking on the Trigger Camera Alert icon in the added Service/Analytic rule on your Cawamo Reseller Dashboard:
Once triggered, return to your CHeKT Monitoring Portal to view the Alarm Event generated from Cawamo:
Thank you for reading!
Related Articles
Overview of CHeKT API Integrations
There are Two main methods of utilizing API calls to interface with the CHeKT solution. Our Local API method is designed to create alarms on a CHeKT Bridge channel from a local network request with a valid key; the CHeKT Cloud APIs are designed to ...Integrating Unifi Protect into CHeKT
Integrating Unifi Protect into CHeKT Starting out in the web interface of the Unifi device: * Click Protect * Click Devices * Change name of camera to desired name * If you have more than 1 bridge, we recommend adding CH1.1 > Ch1.2 to keep track of ...Integrating CHeKT with my central station software
CHeKT has developed a method of bringing Video Alarm Verification into the alarm central station and control room. Our integration with alarm automation software allows the CHeKT platform to deliver alarm signal traffic and an interactive video ...CHeKT P-Series AI Cameras
The latest licenced plug-in is a set of analytical tools loaded on our cameras that provides the means to perform advanced analytics, reduce false alerts and customize when events occur. This article will describe how to enable and configure the ...CHeKT E-Series AI Camera Models
The E-Series AI camera boasts a robust construction, ensuring its ability to withstand various environmental conditions. When using the CHeKT Video Bridge, this camera takes advantage of modern IP technology to communicate alarm signals from the ...