Secondary Ethernet Configuration on the Dual NIC CKB416
The CKB416 Hardware version includes a second Ethernet Port that can be configured independently, allowing for connection to the Isolated LAN of a camera or device network.

This function is not supported by previous hardware versions

The LAN connection closest to the standard USB slots is the "Main Ethernet" port (NIC 1) , and the LAN connection nearest the USBC connection and CHeKT Logo is the "Secondary Ethernet" port (NIC 2).
When installing the Bridge, ensure that NIC 1 is connected to the network with internet access, and NIC 2 is connected to the network with access to the desired devices:
If not yet accomplished, follow the https://support.chekt.com/portal/en/kb/articles/registering-a-chekt-bridge guide to enroll the unit.
Access the Network Tab ( https://support.chekt.com/portal/en/kb/articles/bridge-network-tab ) of that unit in the Dealer Portal:
Click on your Secondary Ethernet configuration line:
Configure the Secondary Ethernet Adapter to your target subnet range:
The IP camera I plan to connect to this bridge has an IP address of 192.168.0.90. I have simply selected an IP address on that .0 range that I know is open, and won't cause any IP conflicts on that Local Area Network
Apply changes:
When Adding the camera, be sure to select the CKB416 you have just configured:
When you choose the mounting channel and the scan initiates, you will see the results from both Local Network Adapters: 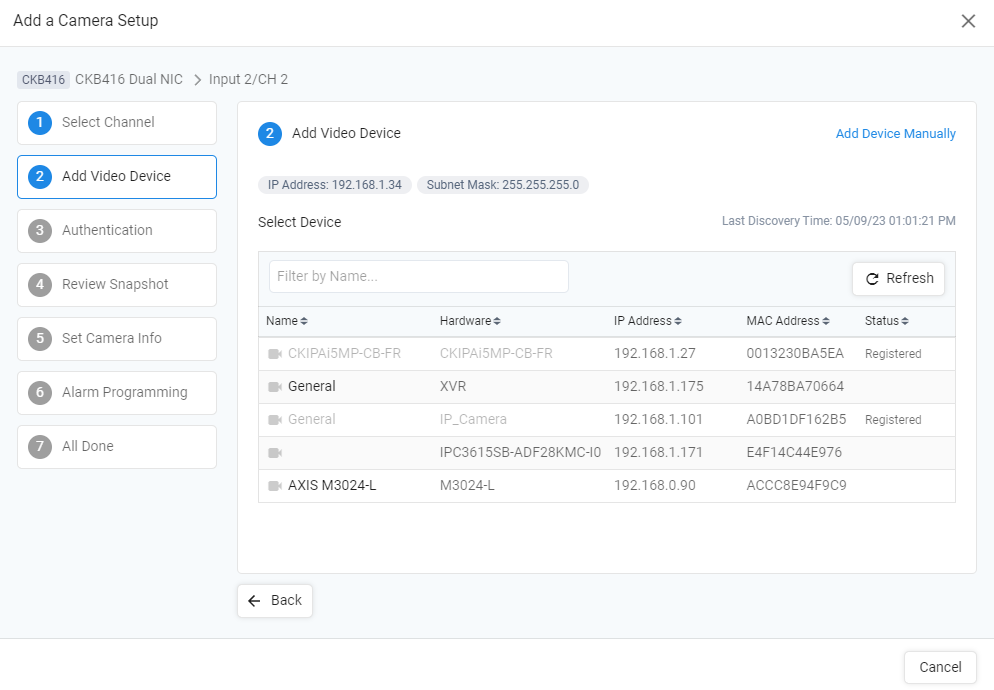
Note the Main Ethernet Adapter is on the 192.168.1.X subnet, and my Secondary Ethernet Adapter is on the 192.168.0.X subnet, so the Bridge will see the results from both
The IP cameras on both networks should mount following the standard https://support.chekt.com/portal/en/kb/articles/connecting-cameras-to-a-chekt-bridge guide.
Thanks for reading~
Thanks for reading~
Related Articles
Adding a Secondary Network Connection via USB Adapter
This article's primary goal is to teach the user how to set up a dual-NIC configuration using the CKB308 or CKB312 and a third party USB to Ethernet adapter. CHeKT has no officially recommended adaptor, but our agents have confirmed this unit works : ...VCP "Bridge" Firmware Version Release Notes
Below are the release notes for the CHeKT Video Control Panel Firmware versions. Video Control Panel (VCP) "Bridge" Firmware 6.0.0/6.0.0.1 Build 1 - Release Date 5/26/26 (Bug Fixes / Improvements) Previous Versions: Bridge Firmware 5.2.0 Build 1 - ...CHeKT Bridge: Hardware Version CKB416v1
Unit Introduction: The CHeKT CKB416v1 is a 16 Channel Video Alarm Panel with the addition of hard-wired terminals for 12v DC Power, arming and a relay output. This is an improvement on our previous CKB416v0 . This unit also has a Primary Network Port ...CHeKT Bridge Arm/Disarm Wiring Guide
Why is using the Bridge Arming Input Important? Like an alarm panel, the armed state of the Bridge will control when the Bridge input zones and events from camera analytics are active and send signals to a central station. If you set the Bridge to ...Alarm Panel Pairing: Programming with The Bridge
Alarm Panel Pairing Mode: When a Bridge is programming in Alarm Panel Pairing mode, the Bridge is a video alarm module to the on-site alarm system. The Bridge will capture video events for all alarm zone triggers. To change your Site Programming mode ...