VMS Video Vault: Camera SD Card Access
SD card video retrieval with App use is now possible with any camera supporting the ONVIF Profile G Standard.
This Knowledge Article will go over the set-up process for CHeKT's E-Series cameras.

While any camera with Profile G should allow the usage of the App, we highly recommend that you test your unique camera model to confirm the compliance and operation while using Profile G.
Setting Up Your CHeKT Camera
Start with making sure that the camera is set up with optimal settings before moving forward.
Make sure you are using the latest CHeKT camera firmware and the latest CHeKT Video Control Panel firmware.
- Camera Firmware: https://support.chekt.com/portal/en/kb/articles/chekt-eseries-cameras#Firmware_Date_27March2025
- Updating your CHeKT VCP: https://support.chekt.com/portal/en/kb/articles/updating-bridge-firmware
Once this is complete, log into your camera:
Go to Configuration > Video Settings > Base Stream & ensure that all of the settings seen below are in place.
Go to Configuration > Video Settings > Base Stream & ensure that all of the settings seen below are in place.
Profile G is on by default out of the box, but it's important to know where the function is in the event it's turned off.
While still in the cameras local menu go to Network Services > ONVIF Configuration > Profile G and turn on Profile G. Turning on Profile G will allow us to record to a micro SD card.
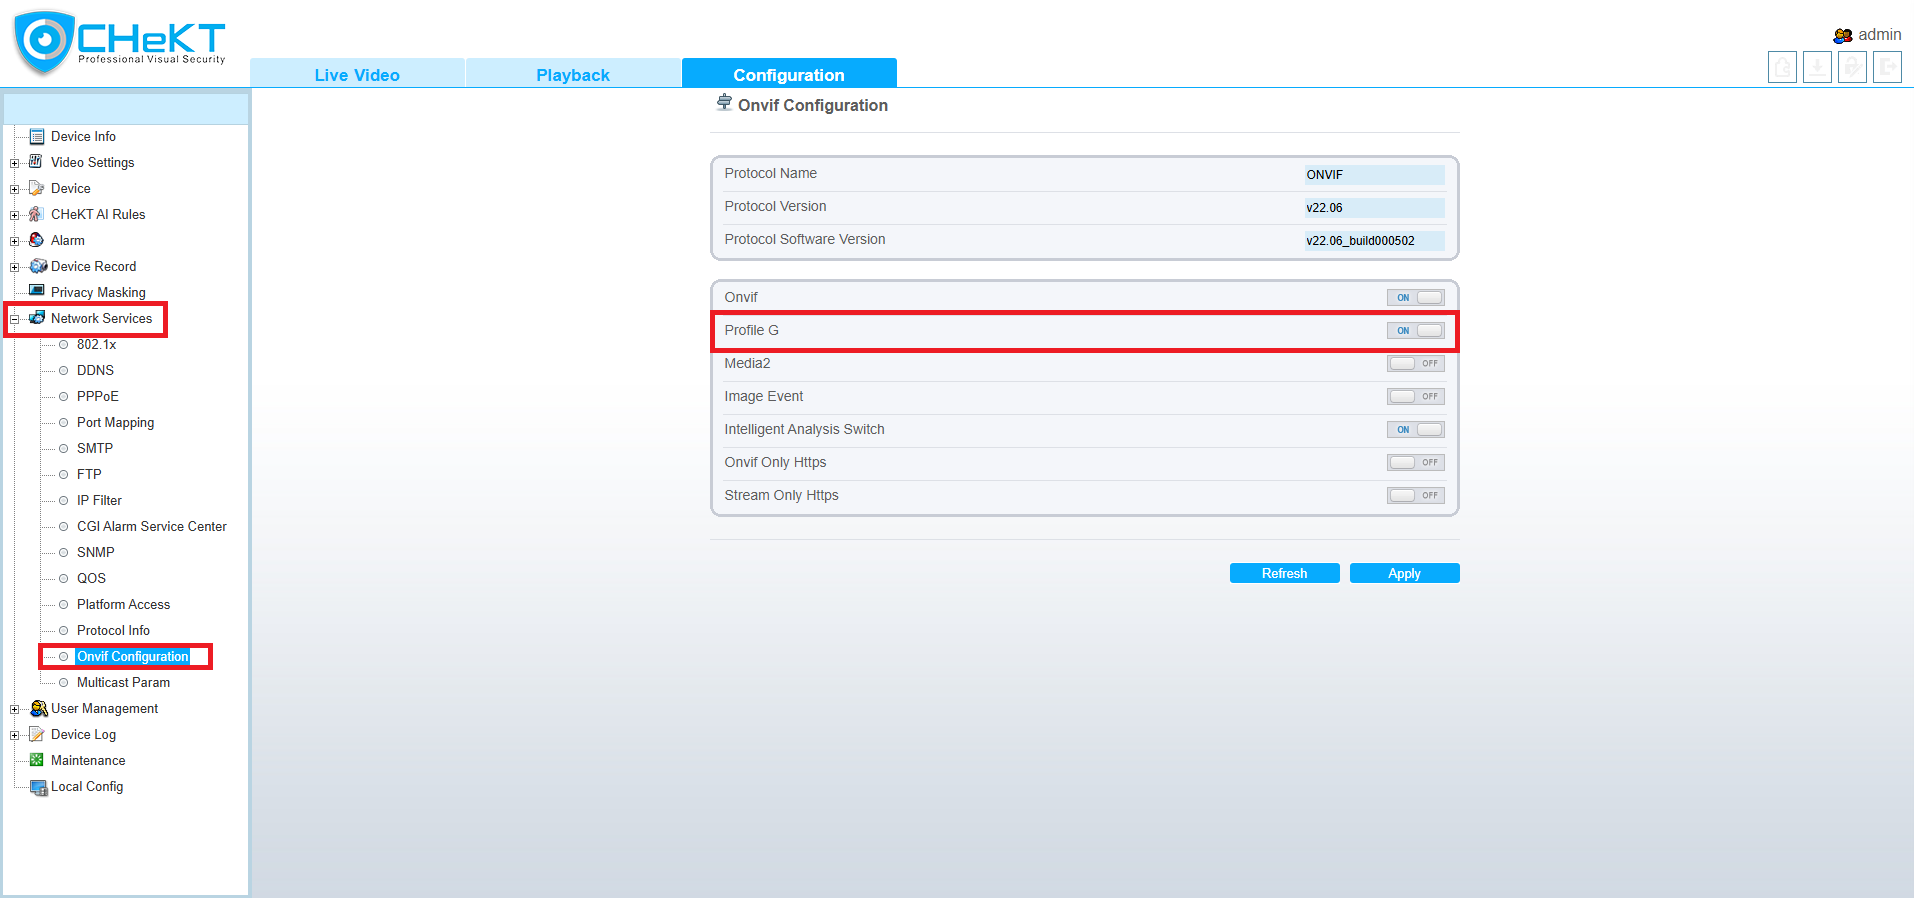
 Profile G is required for SD recording access. On the Most Recent CHeKT Firmware, the CHeKT Cameras should have ONVIF Profile G enabled by default. Ensure you check with your respective camera support team to verify if this is enabled by default and where to toggle in the camera if necessary.
Also, keep in mind that cameras have a preferred Micro SD card that works best. The Western Digital Purple Micro SD can be found here and is recommended for 24/7 surveillance usage.
What is the maximum size SD card that the cameras can support?
256GB
- CKIPC4MPT-12vDI
- CKIPC4MPT-Z
- CKIPC4MP30XPTZ
1TB
- CKIPC8MP180B
- CKIPC4MPBNV-12vDI
- CKIPC4PTNV-12vDI
How much memory is used on a daily basis if they were to record 24/7?
This depends on the bitrate the camera uses, so the memory used fluctuates depending on how the bitrate is configured.
Following enabling Profile G, the schedule for recording needs to be configured and enabled.
While still in the camera's local menu go to Device Record > Record Policy (as seen below).
Once there, you'll see the screen as seen below and three parameters need to be addressed.
1. Record Rule: This should be turned on to Overwrite so that the SD card is used over and over again, not causing a stoppage because the card is at 100% capacity.
1. Record Rule: This should be turned on to Overwrite so that the SD card is used over and over again, not causing a stoppage because the card is at 100% capacity.
2. Stream Name: This should be set to Stream 2 so that the footage coming from Stream 2 is retrieved without delay.
3. Armed Schedule: The grid (as seen below) should be all blue so that the schedule for recording is available 24/7. Click on the Blue Armed button and highlight the entire grid to enable the schedule.
Click Apply.
Enable CHeKT VMS Video Vault on your CHeKT Dealer Account
Go to your Dealer Portal > Log in > Select Your Site > VMS Service
Select one of the Video Vault Plans
When enabling the VMS Video Vault service, Time Sync for each camera will automatically be enabled. Time Sync settings can be review within from the CHeKT Site Device list, Camera > Device > Time Sync Mode.
Once your cameras are setup and your CHeKT site has a Video Vault enabled, customers can access the camera SD recording.
Accessing Camera Device SD Recording
From the CHeKT Mobile app or the by using app.chekt.com.
Once you're on the camera that has the active Micro SD card you will see this icon to indicate the playback function.
Click on the Arrow and you will see the bottom of the screen populate both Armed and Disarmed events for quick reference as well as access to the full playback of the card.
- Disarmed Event
- Armed Event
If you want to click between each event, one at a time, you can select the Arrow keys to go back and forth between events.
Related Articles
VMS Video Vault – Site-Based Cloud Video Recording & Storage Services
Overview CHEKT's VMS Video Vault is a site-based cloud video recording and storage solution. Each site can be individually assigned a Video Vault plan, ensuring flexible and scalable storage options tailored to its unique security needs. Video Vault ...CHeKT E-Series AI Camera Models
The E-Series AI camera boasts a robust construction, ensuring its ability to withstand various environmental conditions. When using the CHeKT Video Bridge, this camera takes advantage of modern IP technology to communicate alarm signals from the ...Deleting a Camera in CHeKT Support
Removing a Camera When completely removing an IP camera, the user will lose access to the video and snapshot events and the configurations from that device! Click on the "Customers" tab in your Dealer Dashboard Menu. Click on the desired "Site" where ...Analytic Triggers: Using Camera Analytics
Analytic Events Supported analytic event triggers from a camera mounted to the bridge can generate alarm signals and video events. These events are based on a supported API connection with the camera. The network event message has topic information ...Connecting the Bridge to the LAN for Camera Access
The Bridge connects to the local area network with a single ethernet interface card. The local area network that the Bridge connects to must have access to the internet on ports 80 and 443. These are the two ports the Bridge uses to communicate to ...