CHeKT E-Series AI Camera Models

The E-Series AI camera boasts a robust construction, ensuring its ability to withstand various environmental conditions. When using the CHeKT Video Bridge, this camera takes advantage of modern IP technology to communicate alarm signals from the video analytics detection. This seamless integration allows for instant notifications to the CHeKT smartphone mobile app and the alarm monitoring center, putting the power of real-time video monitoring right at your fingertips, wherever you are.
We understand the importance of user-friendly interfaces, and our camera's software is no exception. With an intuitive and easy-to-navigate dashboard, managing video feeds, alarm settings, and analytics parameters becomes a breeze. Let's get started.
The E-Series AI Camera Models:
- CKIPC4MPNVT-12vDI: 4MP IP Turret (NightColor Lens) w\AI Detection, Alarm Input, 12v Output & Active Deterrent Lights
- CKIPC4MPNVB-12vDI: 4MP IP Bullet (NightColor Lens) w\AI Detection, Alarm Input, 12v Output w\10w Speaker & Active Deterrent Lights
- CKIPC4MPT-Z : 4MP IP Varifocal Turret (IR Lens) w\ Alarm Detection, Alarm Input, 12v Output
- CKC8MP180B: CHeKT 8MP AI 180 Degree Panoramic Bullet Camera
- CKIPC4MP30XPTZ: CHeKT 4MP 30x PTZ Camera

Not sure which accessory you need? Check out our Mounting Accessories Flow Chart for a quick guide.
The following items are generally the same across all E-Series models.
12v Power Output & Relay Specs
Several CHeKT E-Series cameras support a 12v Power Output for powering external devices and a controllable relay for automation and control with API Commands.
- 12v Output: DC12v & 0.3Amps
- Relay Load: DC12v & 0.5 Amps
SD Card Support
Max 256GB
- CKIPC4MPT-12vDI
- CKIPC4MPT-Z
- CKIPC4MP30XPTZ
Max 1TB
- CKIPC8MP180B
- CKIPC4MPBNV-12vDI
- CKIPC4PTNV-12vDI
What brand of SD cards work best with all our supported cameras?
Connect to the Local Interface:
For all CHeKT cameras, DHCP is the default TCP/IP mode. Please locate your camera's IP address and launch the local interface login page. Use the default credentials, admin/admin, and click on the blue arrow box to proceed.
Apply a new password of your choice and click okay to save.
Setting Password from the CHeKT Dealer Portal:
On the Authentication and 3rd step of the Add Camera Setup
wizard, the following notice will be presented to you automatically:
From the Default Password Notice, please click the Change Password button to proceed to the next window.
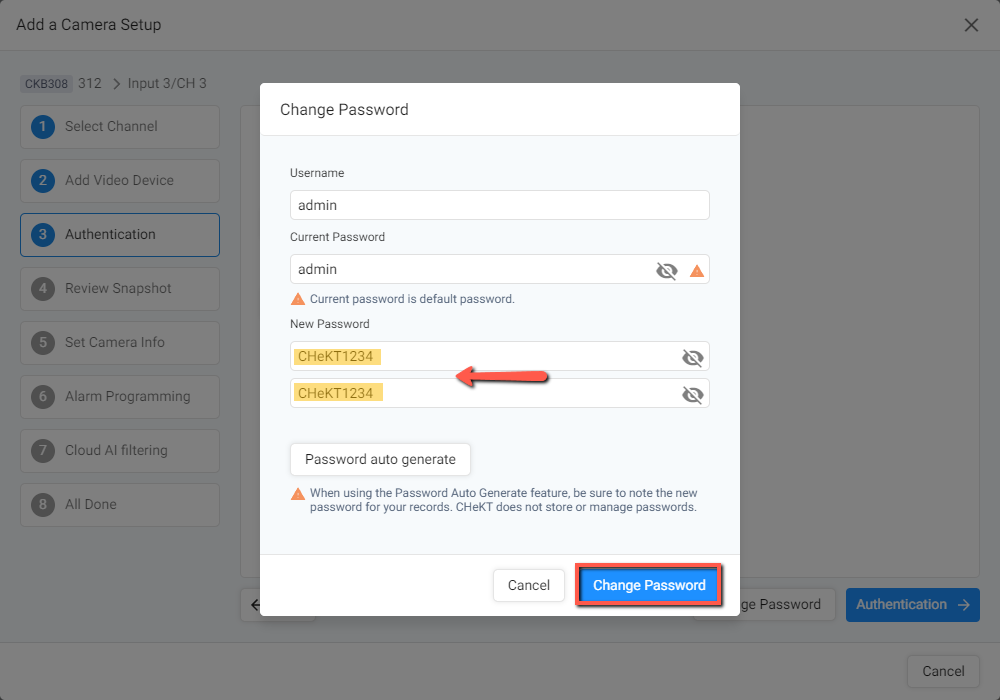
In this next window, notice that the current default password is automatically filled in. Please apply the new password of your choice and click the Change Password button to save.
In this next window, notice that the current default password is automatically filled in. Please apply the new password of your choice and click the Change Password button to save.
Network
As mentioned above, the camera is set to DHCP mode by default, if you need to change it to static mode, please navigate to the local interface and click the Configuration tab followed by the Device Tab, to expand the drop-down menu and then click Local Network:
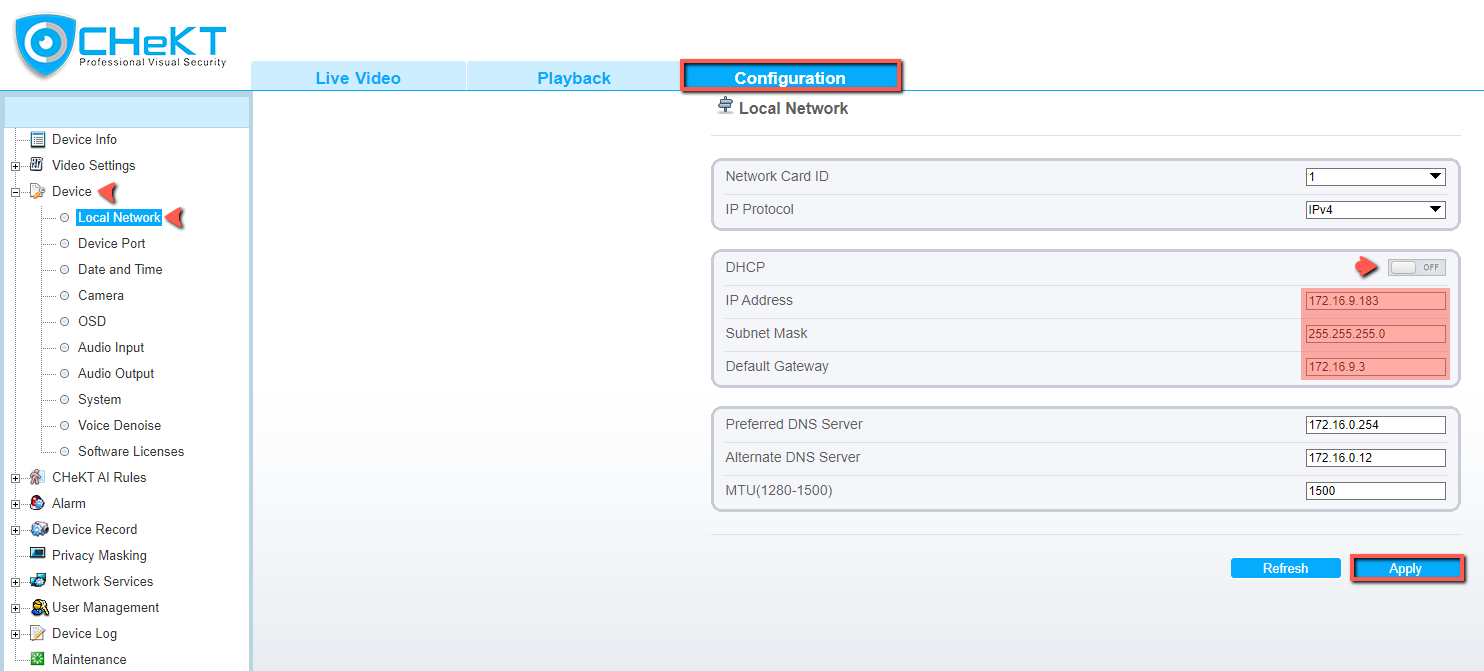
In the Local Network configuration, disable DHCP by clicking the toggle next to it, this will then express the IP Address, Subnet Mask, and Default Gateway fields. Fill in the field accordingly and click Apply to save.
In the Local Network configuration, disable DHCP by clicking the toggle next to it, this will then express the IP Address, Subnet Mask, and Default Gateway fields. Fill in the field accordingly and click Apply to save.
Video Settings
Orientation:
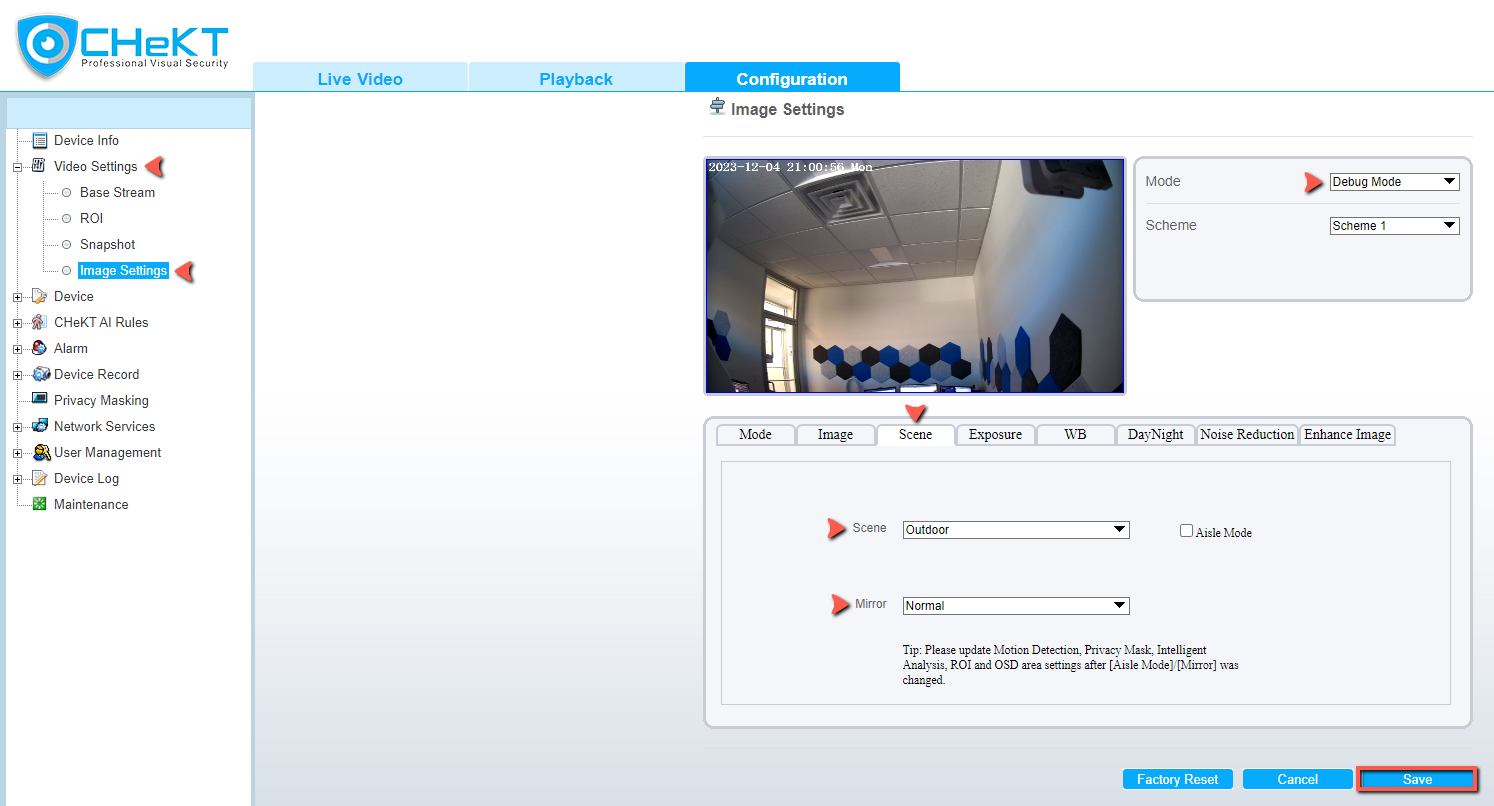
To change the orientation of a previously mounted camera, please click the Video Settings to expand the drop-down menu and then click Image Settings.
To change the orientation of a previously mounted camera, please click the Video Settings to expand the drop-down menu and then click Image Settings.
In the Image Settings configuration, please click and select Debug Mode to express the manual configurations under the Scene tab. Choose your Scene and Mirror options to change the orientation of your stream and click Save to apply changes.
DayNight:
In the same Image Settings configuration menu, click on the DayNight tab, to change the Auto mode to a setting of your choice, then click Save to apply changes:
CHeKT AI Rules
The 4MP AI Camera, has both Intrusion and Single Line Crossing AI Rules enabled by default, however further adjustments can be made to ensure valid alarm activations occur.
Intrusion:
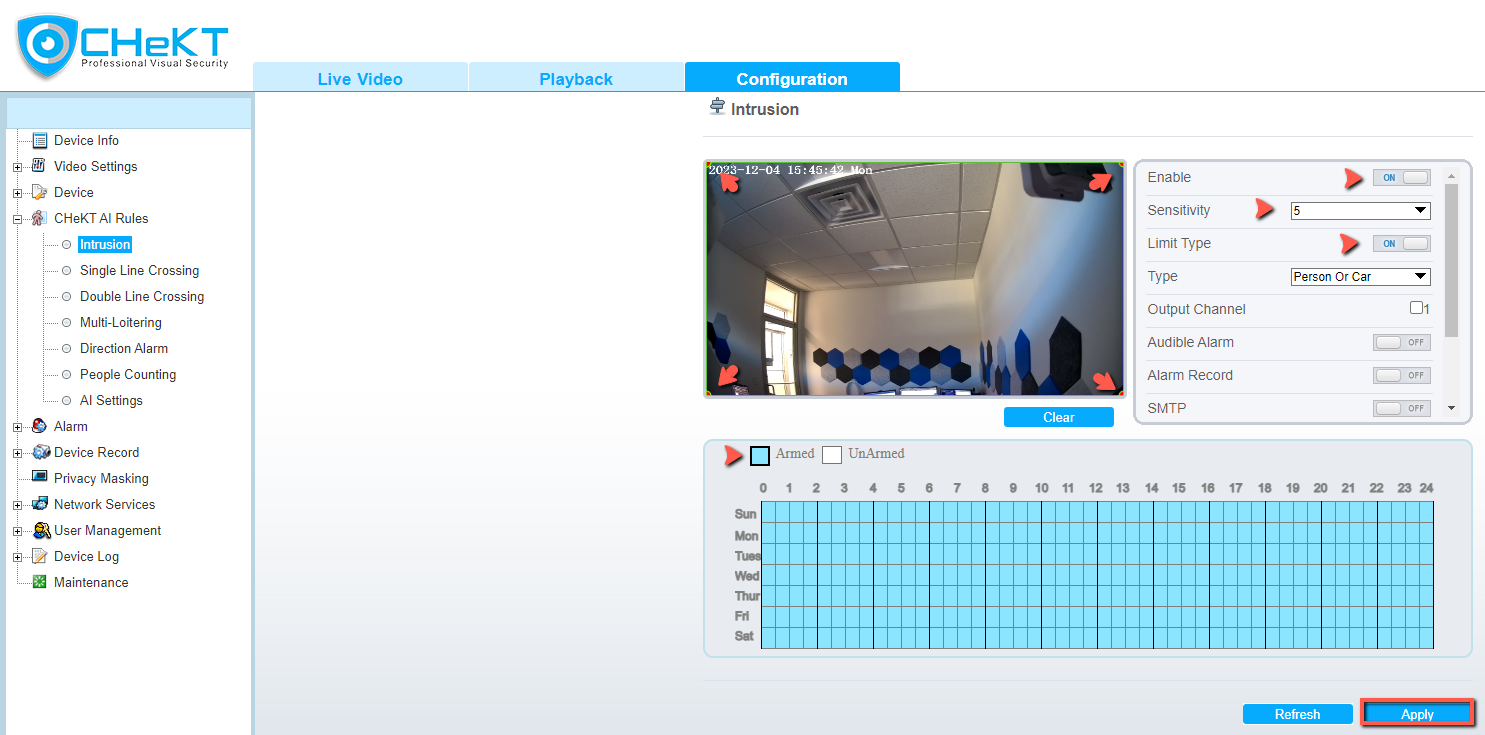
If intrusion is not a rule you wish to use, click the Toggle next to Enable to disable it completely. If you wish to use this rule, you may map a new region by using the left-mouse-click to begin mapping and then right-mouse-click to stop mapping; otherwise, the entire view of the stream would be the region by default. You can also decrease the Sensitivity and disable the Limit Type option to allow this rule to trigger by objects other than the default objects, Person or Car. Additionally, you can choose to disable the Video Stream Draw Line to avoid the Intrusion Region bounding lines from appearing on the stream and the Whitelight Alarm, to avoid the camera lights from switching on during an activation. To finalize, please select the days you wish this rule to be active on, and click Apply to save.
Intrusion:
If intrusion is not a rule you wish to use, click the Toggle next to Enable to disable it completely. If you wish to use this rule, you may map a new region by using the left-mouse-click to begin mapping and then right-mouse-click to stop mapping; otherwise, the entire view of the stream would be the region by default. You can also decrease the Sensitivity and disable the Limit Type option to allow this rule to trigger by objects other than the default objects, Person or Car. Additionally, you can choose to disable the Video Stream Draw Line to avoid the Intrusion Region bounding lines from appearing on the stream and the Whitelight Alarm, to avoid the camera lights from switching on during an activation. To finalize, please select the days you wish this rule to be active on, and click Apply to save.
Single Line Crossing:
If Single Line Crossing is not a rule you wish to use, click the Toggle next to Enable to disable it completely. If you wish to use this rule, unlike the Intrusion rule, the Single Line Crossing requires for the rule line to be drawn. Once you have drawn and positioned your rule line, you will be given the option to select in which direction the rule applies: Bidirectional, Reverse, or Positive. This rule has the Limit Type option disabled by default, if you wish for this rule to only trigger by Person or Car, enable this option. Similar to the Intrusion rule, you can also choose to disable the Video Stream Draw Line to avoid the bounding lines of the rule from appearing on the stream and the Whitelight Alarm, to avoid the camera lights from switching on during an activation. To finalize, please select the days you wish this rule to be active on, and click Apply to save.
Updating Camera Firmware
Latest Firmware: December 2, 2025:
To update a camera, go to Configuration > Maintenance
Once you're in the Maintenance Tab, you need to select the firmware file that is listed below this instruction. Afterwards, click on the file folder and find the firmware file that was saved to your local PC. After you've selected the correct update file, click Update. The update will take place in real time, and the camera will then restart automatically.
Looking for something specific? Check out our Advanced Features FAQ Article:Advanced Features Article
Related Articles
CHeKT E-Series AI Camera - Auto-Update
This feature is effective from FW ~.61 onwards. Please ensure your camera is on version ~.61 or later before attempting to enable this feature. Basic feature info The OTA (Over The Air) Upgrade feature allows cameras to automatically check for and ...CHeKT AI Cameras Analytics Manual
The latest licenced plug-in is a set of analytical tools loaded on our cameras that provides the means to perform advanced analytics, reduce false alerts and customize when events occur. This article will describe how to enable and configure the ...CHeKT AI Server Installation and Operation
There are 2 ways the AI Server can be discovered: via MAC Address on the network using the bridge tools or the Ai server discovery tool: Link to Discovery Tool Download How to use Network Scan Tool via CHeKT Dealer Portal: The CHeKT AI Server will ...CHeKT Cloud AI Filtering: A Practical Setup Guide
CHeKT Cloud AI filtering is available to all CHeKT Dealers on the CHeKT Professional and Premium plans; it offers an additional level of false alarm prevention to be used in tandem with the intelligent analytic detection on the mounted camera. How it ...Cawamo-CHeKT Integration Guide
The Cawamo AI Server integrated with the CHeKT platform creates video AI event notifcaitons for alarm monitoring centers and customers using the CHeKT Mobile app. This integation allows sites to leverage Cawamo's advances AI as detection zones for ...